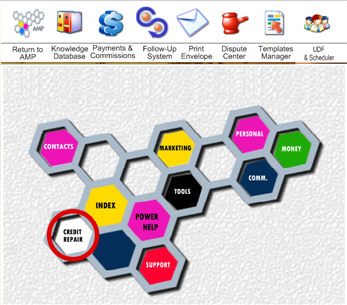
When you click on the CREDIT REPAIR section in the road map the main tools to repair credit will be shown.
These are the areas you will use the most when repairing credit.

The first thing you should do is to go to
the Knowledge Database by clicking the  button
and read as much as possible, but at least, the REGULATIONS FOR CREDIT
REPAIR ORGANIZATIONS in the legal category.
button
and read as much as possible, but at least, the REGULATIONS FOR CREDIT
REPAIR ORGANIZATIONS in the legal category.
To show the ROAD MAP again just click the
 button
STEPS TO REPAIR CREDIT
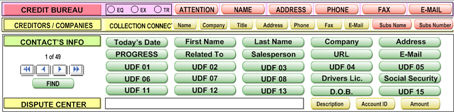
1) Enter
your basic customer information in the main screen
. 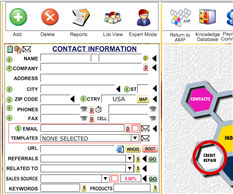
2) Enter Social Security , Drivers License
and Date of Birth in the User Defined Field accessible by clicking the
 button.
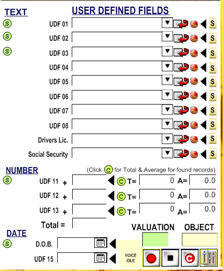
Information entered in these and other fields will be used as merged fields in the Templates Manager.
3) Click the  button
or the
button
or the
 button (you
will see the difference later).
button (you
will see the difference later).
The Template Manager interacts with four databases at the same time, the Credit Bureaus database, the Creditors database, the Contacts database and the Disputes database.
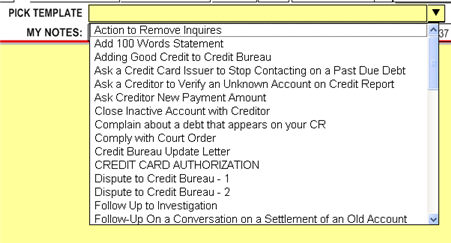
To select a template (letter) first select the category you want by clicking in the green field
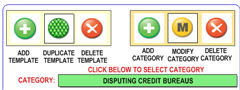
The Category field will open and let you select a category.
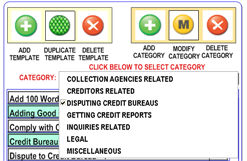
The initial categories are: Collection Agencies Related, Creditors Relates, Disputing Credit Bureaus, Getting Credit Reports, Inquires Related, Legal and Miscellaneous.
You can add unlimited categories and then add, duplicate and/or modify unlimited templates (letters) inside each category.
Once a category is selected, click on the letter that you want to use or see.
A template is comprised of text plus symbols that will be replaced (merged) with real data at the time of printing.
For example, let's use the PROGRESS STATUS FOR <<First-Name>> <<Last-Name>> template located in the Miscellaneous Category.
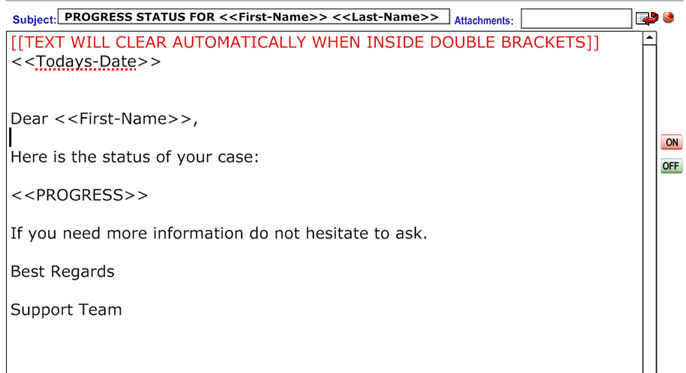
The first thing that we see is the subject or name of the template PROGRESS STATUS FOR <<First-Name>> <<Last-Name>> this is the title (subject or name) that you see in the template list.
This particular template has to MERGE
SYMBOLS in the title <<First-Name>> and <<Last-Name>>
. These symbols were entered by clicking on the  buttons
.
buttons
.
Now, please notice the text in red. [[TEXT WILL CLEAR AUTOMATICALLY WHEN INSIDE DOUBLE BRACKETS]] . This text will NOT show when previewing, emailing or printing.
To achieve this, the text has to be enclosed in DOUBLE BRACKETS . This "trick" is very useful in templates that contain several paragraphs but only some of them are used for a specific situation. In this case you can hide or show at will those paragraphs just by adding or deleting the double brackets.
To ease this task you can click on the  buttons located
in the right margin of the template.
buttons located
in the right margin of the template.
This particular template is used to report the case status to your clients with one click.
Please notice the <<PROGRESS>> symbol which was entered
by click on the  button
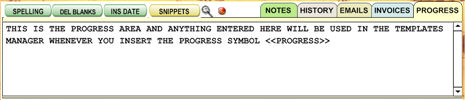
This particular symbol will be replace with any information entered in the PROGRESS area in the main screen
For example, it is very easy to click a button to select all your active clients.
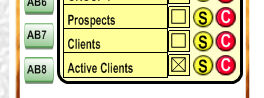
and then email this
"PROGRESS STATUS" template to ALL your active clients with one
click 
This feature will save literally tens of hours a month simply by telling your clients that you will send them a Progress Report every so often instead of letting them to call you at will to know the status of their cases.
You should read all templates and get acquaintance with their content. This way you can handle all you clients from the Disputes Center without having to go to the Templates Manager.
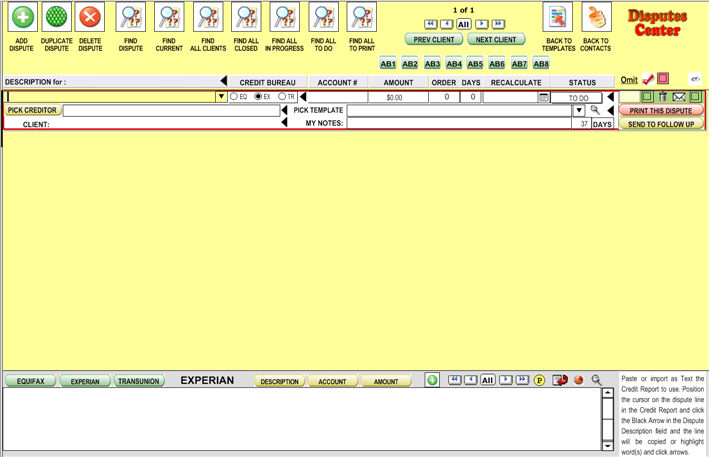
4) Enter the Dispute Center by clicking on
the  button or the button from the Main
Screen.
button or the button from the Main
Screen.
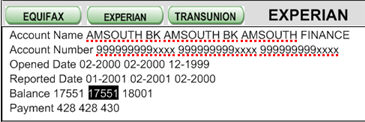
You can highlight and paste dispute information from Credit Reports or type the information manually.
If you can get a Credit Report in text form (PDF files can be exported to text form for example) you can use the highlight and paste system.
The simplest way is to place the Credit Report in your Windows clipboard
(usually by pressing CONTROL+A
to select ALL text and then, CONTROL+C to copy the selected text to the
clipboard then select the credit report you want to paste to either 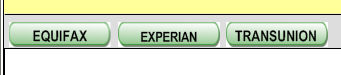 and
click the PASTE button
and
click the PASTE button  to paste the report in the corresponding
field.
to paste the report in the corresponding
field.

This is a virtual window which means that only contains a few lines from the Credit Report.
To move up or down click the scrolling bar  at
the right of
the field.
at
the right of
the field.
Also you can click the magnifier  icon to display the whole
Credit Report and position yourself in the area you want to use. When
you close the zoom view, the correct area will be selected.
icon to display the whole
Credit Report and position yourself in the area you want to use. When
you close the zoom view, the correct area will be selected.
This is done this way so the view for the Credit Report is persistent even when you change Credit Bureaus or even if you change clients.
To add a dispute click the  button
or the
button
or the 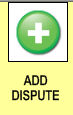 button at the top of the screen.
To enter a dispute description click on the  button in
the Description field.
button in
the Description field.
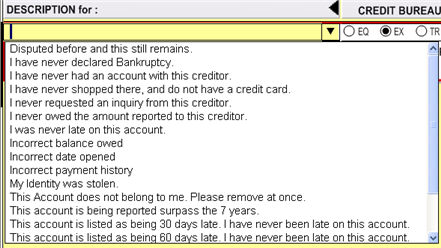
and select the description you want or you can type it or you can highlight and paste it from the Credit Report. (more on this later)
Then, select verify that the Credit Bureau selected is correct for the
dispute 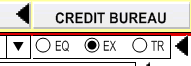 (it should be correct automatically)
To enter the Account ID (number) it is easier, faster and more accurate to use the highlight and paste system.
First, highlight the account number you want to paste (possibly by double clicking on it)
Then, click on the  button.
The text highlighted will be pasted in the current dispute account field.

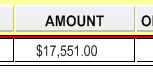
Now,highlight the amount of this dispute (if any)
and click the  button. The amount will be pasted in
the current dispute amount field..
button. The amount will be pasted in
the current dispute amount field..
Now, select the creditor as appropriate by clicking the 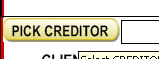 button.
To enter new Creditors go to
the Virtual Persona section located in the setup area. There
is a button in the top right of the Main Screen to go to the  setup
area, then select the VIRTUAL PERSONA tab.
setup
area, then select the VIRTUAL PERSONA tab.
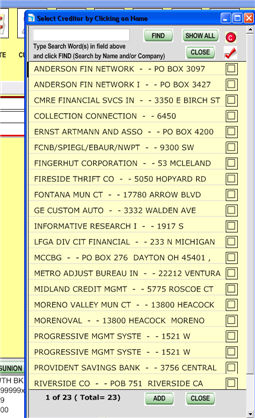
An important feature is to check those creditors that you need to interact with for this client
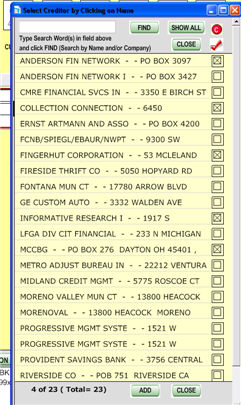
and then click the  button at the top of the checkmark
column to select only those.
button at the top of the checkmark
column to select only those.
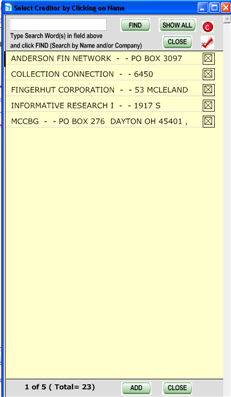
To insert a Creditor in the dispute creditor field just click on it.

Then, click the arrow to open the templates pull-down menu

Select the template to use. In case that you want to preview the template
please click on the magnifier  button.
Us the Notes field to enter you own notes (possibly the strategy that you would use with this dispute)

If you click on  the current date and time will be pasted
automatically in the Notes field.
the current date and time will be pasted
automatically in the Notes field.
You will keep adding all disputes as appropriate in this example I just duplicate the first dispute several times.

Now is time to enter your schedule strategy (very important)
Since you should not send your clients's disputes .all at the same time, the Dispute Center provides a very easy way to schedule your disputes .
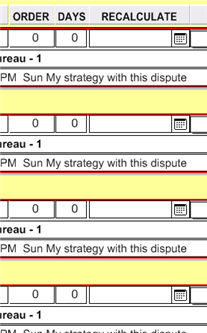
To this purpose three columns are used: the ORDER column, the DAYS (in between) column and the RECALCULATE column.
First enter the order that you want to print your disputes (do not worry about timing yet), possibly selecting the easy ones first to produce faster results for your clients.
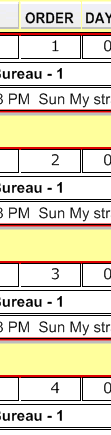
You DON'T need to order then in its present order you can use any order
and click on the 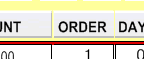 button at the top of the column to sort
it by order (either ascending or descending)
button at the top of the column to sort
it by order (either ascending or descending)
Now, after sorting by order
and taking in consideration that the  column means days in between disputes select your
schedule strategy by selecting the days in between strategies.
column means days in between disputes select your
schedule strategy by selecting the days in between strategies.
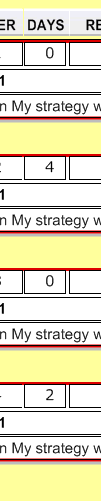
For example this sequence (0 -4 -0 -2 ) represents TODAY, four days after today, then four days after today again and two days after the four days or six days from today.
Please notice the importance of knowing that the days numbers you enter are always days in between from previous dispute.
The first dispute (based on order) will be calculated based on today's date therefore a zero represents today for the first dispute but will represent the same date as the previous dispute for any other dispute.
Finally, click  and the Dates will be populated as appropriate.
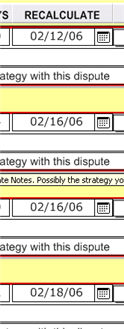
Only disputes with  status will be taken in consideration.
Disputes IN PROGRESS or CLOSED don't change there dates (you can do it manually as necessary)
Also, only the current client is taking in consideration when recalculating dates.
Remember that you can have hundreds of clients and their disputes interacting the Dispute Center but you will be able to control all of them with ease as I will show you later.
Use the navigation bar 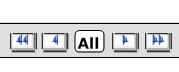 at the top or bottom of the screen
to more from dispute to dispute. In this way the current dispute can be
identified by a green
at the top or bottom of the screen
to more from dispute to dispute. In this way the current dispute can be
identified by a green

background in the right side of the screen
When you have many clients' disputes displayed you can "jump"
to the next/previous client by clicking the  buttons.
\
You can sort by many of the fields by clicking their tiles.

Days (in between ) cannot be sorted for obvious reasons.
5) Everyday you will click on the  button so select all disputes due to print.
In this example only one would be selected but it could be dozens or hundreds.

Remember that you can have many clients at the same time and that you will select ALL disputes that should be printed from ALL clients at the same time this way you will spent only minutes to print dozens of letters.
To print a dispute click on the 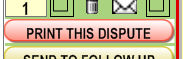 button.
You will be presented with two very important choices. (majority of times you will click enter to select the default option)
The first choice is weather or not you what to send the dispute to the Follow-Up System, usually you want this.
Then, the status of the Dispute will change to IN PROGRESS automatically and you can select if you want to log that you are printing this dispute in the client's PROGRESS field which will be used to report your client's progress status when you decide to do so.
The rest of options are printing options and usually you will keep pressing enter.
Then click the envelope  button to print the envelope.
It is better to send the dispute by Certified Mail or Priority Mail the reason being is than you can track the delivery of the letter to the Creditor or Credit Bureau on the Internet from Follow-Up system and other places.
You should not pay for deliveries but your clients.
Use the FIND buttons at the top of the screen to select different views of your disputes.

Please notice the difference between FIND CURRENT and FIND ALL.
FIND CURRENT will find ALL disputes for current client (the client whose dispute on are on at this moment) while FIND ALL will find ALL your clients' disputes.
Of course, if you had hundreds of clients (many of them already inactive) and thousands of disputes then displaying of ALL clients could present a problem.
To avoid this potential problem there is a HIDE checkmark 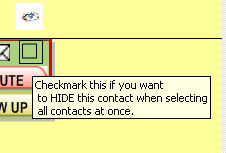 that will HIDE not
delete clients from disputes list when doing an ALL FIND.
that will HIDE not
delete clients from disputes list when doing an ALL FIND.
Reasons to HIDE a client could be: work is finish so client is inactive, client stop paying (in case on instalment payments) so you will hide their disputes until they become active again
To reactivate a client, simply select the client in the MAIN SCREEN
(contact scree) and click the  . Then, all disputes from
this client will be selected. Simple UN-CHECK the client to activate his/her
disputes again.
. Then, all disputes from
this client will be selected. Simple UN-CHECK the client to activate his/her
disputes again.
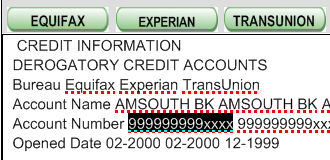
Use  to filter the disputes by the content of the field
at left. Therefore, if you click the black arrow
to filter the disputes by the content of the field
at left. Therefore, if you click the black arrow 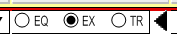 to the
right of the Credit Bureau field while Experian is selected ALL
disputes from CURRENT client for
EXPERIAN will be selected.
to the
right of the Credit Bureau field while Experian is selected ALL
disputes from CURRENT client for
EXPERIAN will be selected.
Use the  button to load a text credit report file from
your hard drive instead of pasting it.
button to load a text credit report file from
your hard drive instead of pasting it.
Use the ACTION BUTTON  as
explained elsewhere in the manual.
as
explained elsewhere in the manual.
Click  to go back to the Main Screen.
FOLLOW-UP SYSTEM
Click on the  button to access the Follow-Up System.
You use the Follow-Up system to track the letters you sent to Creditors and Credit Bureaus, etc.

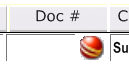
In this example, only one item is displayed.
Item are color coded being YELLOW for OPEN items that are not due RED for DUE items and GREEN for CLOSED items.
Everyday you would click on the  button to reset the dates
in the search fields then click the
button to reset the dates
in the search fields then click the 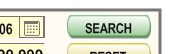 button to select
due items for ALL clients which
they will show in red.
button to select
due items for ALL clients which
they will show in red.

Also, enter your Certified Mail tracking number in the tracking field
 and
click the red action button to track its delivery on the internet.
and
click the red action button to track its delivery on the internet.
When you receive response from a Creditor / Credit Bureau simply change the status of the item to CLOSE and it will become GREEN and it won't be selected in your next search.

In the center section you can query the Follow-Up database by changing the search fields and clicking the search button.
The rest of the options are self-explanatory or are explained elsewhere in the manual.
Based on the response from your Creditors / Credit Bureaus you will keep sending letter as appropriate until you the item is deleted or you realize that the information was accurately verified. Sometimes it takes more that one letter to achieve the desired results.